How to Throw Darts |
If you have watched people play darts in any establishment or on TV then you will have noticed the grip of the dart varies from player to player and so do the darts!
There isn’t one dart fits all. So, buying an expensive set of darts to start off with won’t necessarily give you instant success. Finding a dart that suits you will depend on several factors. Your height and your hand span being two major factors. The weight of darts varies too and we look at dart options later.
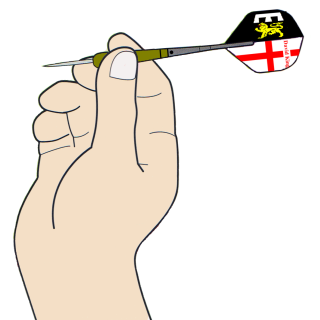
The basic grip of the dart for those of you who have never played before is the pen grip, i.e. just as you would hold a pen! Variations on this grip will naturally follow but to start this is the grip you should use.
For new throwers, the dart should also be held at the balance. So if you are using a long-barrelled dart hold it over one finger until you find the ideal holding point. With tear shaped darts this will be nearer the front barrel. The shaft and flight used will also have an influence on the best hold.
Your grip with naturally develop with play, however, a starting point helps and minor adjustments to your natural style will develop from here.

I have come to realise that websites and books are totally different things when it comes to relaying information. On the web, viewers tend to want answers quickly and to the point unlike books and research papers when more in-depth explanations can be warranted. The throw is a basic hand-eye coordination, however, a few principles will help keep the dart true and consistent.
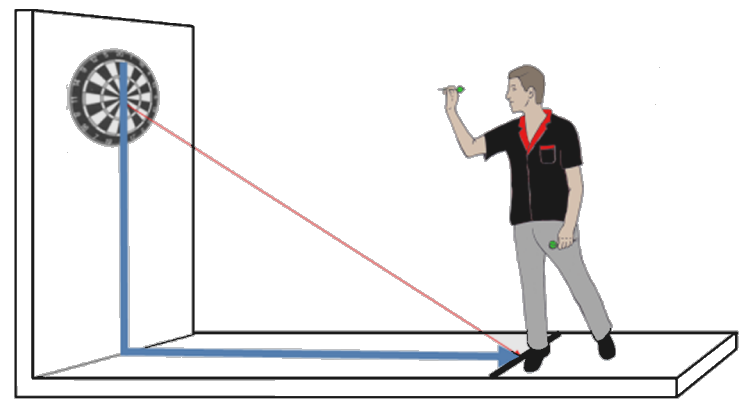
The drawback of the throwing arm should be so the point of the dart is always drawn straight! If you imagine a line running down through the centre of the dartboard and along the floor to the centre of the oche line (throw line) then firstly this is where your lead foot should be. The drawback of the arm/dart should follow this imaginary line. If you are playing darts at home you might wish to draw a line to help you or mark the oche throw line to help position yourself for each throw.
With the arm and dart drawn back, you are ready to throw. It is important that you look directly at the point of the dartboard you wish to hit. With this drawback, the intention is to throw for the twenty through the three i.e. the centre part of the board (see diagram)

Either use the treble twenty or the bullseye initially as a Practice target. You should not aim the dart using the full extension of the arm! This is the most common mistake for beginners. The aim of the dart should be the release point of the dart. To initially gauge this, the forearm will be vertical (pivotal point). Adjust your back foot by bringing this nearer or further away from your lead foot to adjust your height as this will ultimately adjust the throw. Your height will also have a bearing on this. The throw should be swift and the release of the dart should be at the pivotal point. If you are focusing on the target, the release point will come naturally. However, if you are not then you will lose the control of the dart and it will drift to the left or right.
Aiming at a small target rather than large will help more than hinder so the bullseye is a good Practice target as well as the treble.
When throwing the dart allow your arm to follow through after you release the dart just as if you were playing tennis, when you strike a ball with a racket. If you don’t follow through you remove the power out of the dart and it will drop quickly.
You should never allow your back foot to come off the ground. This not only takes the power out of the dart. This also affects your balance and you will ultimately find it harder to gain a consistently good throw. There are very few players that have this technique and it is one that I don’t endorse for those reasons.
Once the dart has landed note where the fall extension of your arm is. If it is to the left or right on the target then your dart will also be left or right of the target. Adjust your stance accordingly to straighten the throw. It is important to give yourself feedback and if observing someone else record what is working and what is not. A slight adjustment with the throw or stance or combination of the two will make a major difference when you are throwing at targets that are relatively small.


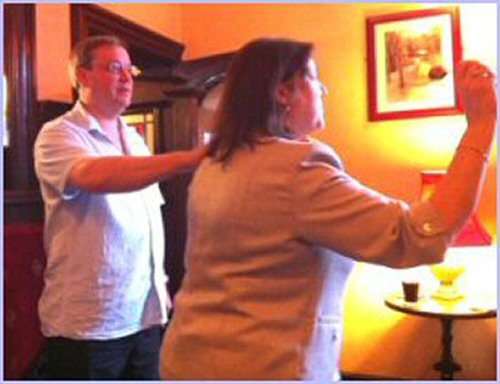
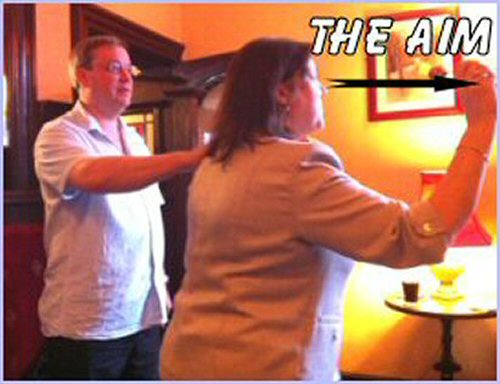
The photo here is to show the dart and eye alignment. This photo shows the Aim, the point of release and as you see the dart is in line with the eye line. The player slightly lent forward i.e. weight on the lead foot. This player was relatively new to darts by with a short period of coaching and feedback the darts were flying true and a fun evening was had by all.

Remember darts should be fun so enjoy the sport. However, it is always worth putting in the Practice if you want to play better.
My Thanks for my sister Susan and brother-in-law for posing for the photographs here. As you see we all had a bit of fun.
For more information about how you can improve your game have a look at the Practice routines, I have on my site. This section of the site is viewed by thousands of viewers and the 180 around the clock! Practice/game has proved a bit hit. I have seen several postings on forums about this Practice routine and you will even find postings on YouTube.